
 By
A new laptop is at its most returnable, most fixable and most replaceable in its first days, so work through this 12-step checklist before you settle in.
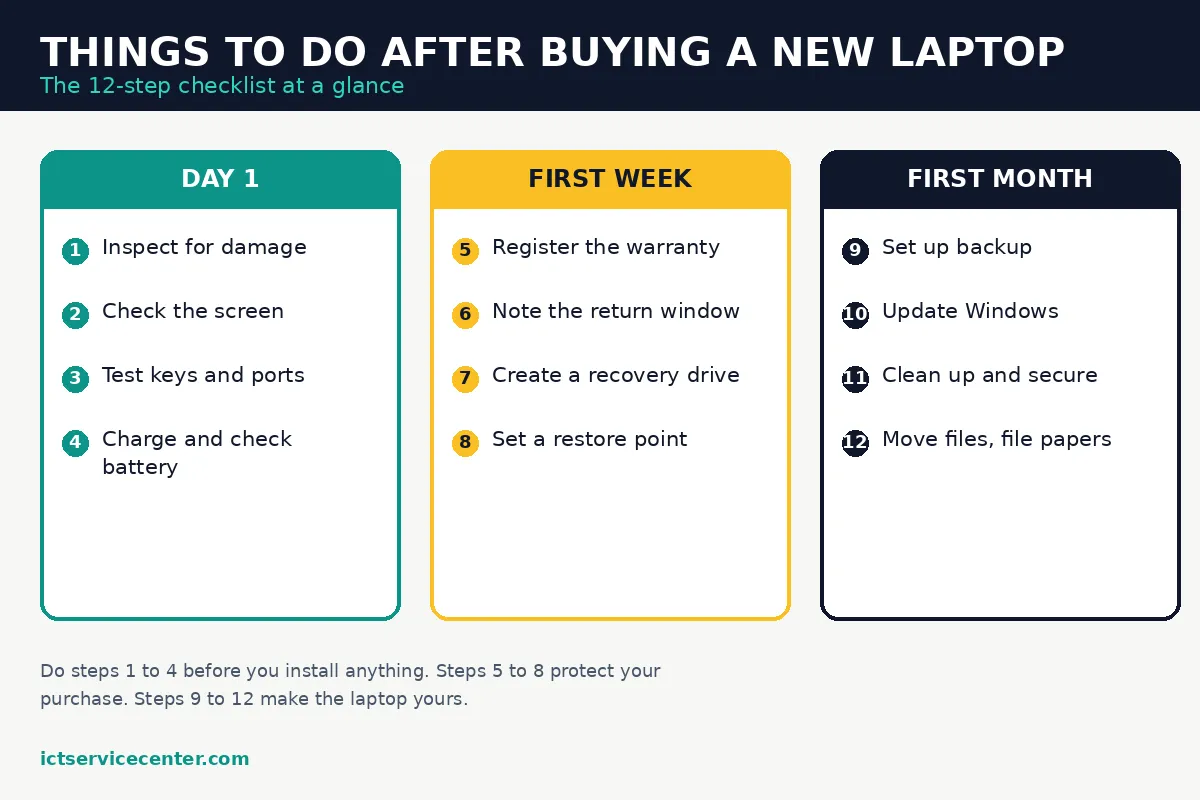
In short: Things to do after buying a new laptop start with a careful inspection: look for damage, test the screen for dead pixels, and try every key, port and speaker. Then register the warranty, note the return window, create a recovery drive, set a restore point and turn on a backup schedule. Finish by updating Windows, removing software you do not need, and moving your files across.
Key takeaways
- Inspect the laptop on day one, while a fault still means a free exchange instead of a repair claim.
- Register the warranty and write down the return deadline before you throw the box away.
- Make a recovery drive and a restore point before you install anything else.
- Turn on a backup schedule in the first week, so your files are protected from the start.
How this 12-step checklist works

This is a checklist, not a setup guide. It does not walk you through Windows setup screen by screen: our companion guide on how to set up a new laptop covers the first 30 minutes at the keyboard. This page covers everything around that first session: the checks, the paperwork and the safety nets. Loaders in this spot often ask about how to set up a desktop as well.
The steps fall into three groups. Day one is inspection, while the return window is wide open. The first week is protection: warranty, recovery drive, restore point and backup. The first month is moving in: updates, cleanup and your files. Print the list and tick each step off as you finish it.
| Steps | When | Why it matters |
|---|---|---|
| 1 to 4 | Day one | Faults found now mean an exchange. |
| 5 to 8 | First week | Warranty, recovery drive, restore point and backup. |
| 9 to 12 | First month | Backup, updates, cleanup and file transfer. |
Steps 1 to 4: Inspect the laptop before you settle in
Open the box on a clean table and check the laptop before you plug anything in. Look over the lid, the base and the corners for dents, scratches and scuffs.
Open and close the lid slowly and check that the hinge moves smoothly, with no grinding or looseness. Press gently around the palm rest and the bottom panel and listen for creaks or loose parts.
Damage found now is the seller’s problem; the same damage found a month later is much harder to explain.
Next, check the screen. Plug the charger in, turn the laptop on and open a full-screen solid white image, then a full-screen solid black image. Look for dots that stay dark on white, or glow on black: those are dead or stuck pixels.
Look at the edges of a black screen for pale patches, which point to backlight bleed.
A single faint stuck pixel may be within the maker’s tolerance, but a cluster of dead pixels, a bright line or a cracked corner is a reason to ask for an exchange right away. Photograph the fault with your phone for a dated record.

Then test the parts you will touch every day. Type a line in Notepad and press every key, including the function row and the arrow keys. Move the pointer across the whole touchpad, tap to click, and try a two-finger scroll.
Plug a USB drive into each port and check that the laptop sees it. Play a short video and listen to both speakers. Test the webcam in the Camera app and the microphone in Sound Recorder.
Finally, charge the battery to full and check its health. Open Command Prompt, run powercfg /batteryreport, then open the report and compare the design capacity with the full charge capacity. A new battery should sit close to its design capacity; if the report shows a large gap, contact the seller.
Steps 5 and 6: Register the warranty and check the return window
Find the serial number first. It is printed on a label on the bottom of the laptop and on the box, and on most models in Settings > System > About. Write it in a note on your phone and photograph the label: you will need it for every warranty claim and support call. If that sounds like your bench, read up on checking for hidden defects before buying next.
Register the laptop on the maker’s support site with that serial number. Registration confirms the warranty start date and, on some brands, adds a longer support window or a free check-in service.
While you are there, read the warranty terms: accidental damage is usually a separate plan, not part of the standard warranty.
If you are unsure how long your cover lasts, our guide on how to check your laptop warranty walks through the check for the main brands.
Then find the return window and write the last day on a sticky note on the box. The window is set by the store, not by the maker, and it starts on the day you bought the laptop or the day it arrived. If you found a fault in steps 1 to 4, this date decides whether you get an exchange or a repair.
Photograph the receipt as soon as you get home. Paper receipts fade, and a photo is easy to find when you need it.
Steps 7 and 8: Make a recovery drive and set a restore point
A recovery drive is a USB stick that can repair or reinstall Windows when the laptop will not start. Make one now, while Windows is healthy. Plug in a blank USB flash drive, select Start, type Recovery Drive and open the tool.
Keep Back up system files to the recovery drive checked, select your USB drive and select Create. The tool erases the drive first, so use one that holds nothing you need.
Microsoft’s Recovery Drive support page lists the same steps and recommends recreating the drive once a year.

A blank 32 GB drive holds the recovery tools and system files, with room to spare.
- The durable, light-weight design of the Turbo Attaché 3 USB 3.0 Flash Drive is the
- Perfect for transferring large files such as movies, videos, photos, music & documents

Next, set a restore point. A restore point is a snapshot of Windows system files, drivers and settings you can roll back to if a driver or an update causes trouble. It does not back up your personal files.
Select Start, type Create a restore point and open the result. On the System Protection tab, select your Windows drive, select Configure and choose Turn on system protection.
Then select Create, type a description such as “New laptop, first week” and select Create again. Microsoft’s System Protection support page covers the same steps.
If you want the full walkthrough, see our guide on how to create a Windows 11 recovery drive.
Do not skip the recovery drive because you have a backup. A backup saves your files. A recovery drive saves Windows itself when the laptop will not start. You need both.
Step 9: Set up backup on a schedule
Set the backup schedule in the first week, so it runs without you thinking about it. Windows 11 gives you two built-in options.
Windows Backup copies your Desktop, Documents, Pictures, Videos and Music folders, plus settings and your app list, to your Microsoft account and OneDrive.
File History copies your libraries and Desktop to an external drive on a schedule and keeps older versions, so you can get back yesterday’s copy of a file.
Start with Windows Backup. Select Start, type backup and open Windows Backup. Sign in with a personal Microsoft account, expand Folders, turn on each folder you want protected, then select Back up. A free Microsoft account includes 5 GB of OneDrive storage, so check how much space your folders need. Microsoft’s Back up and restore with Windows Backup page explains each setting.
Then add File History for a local copy. Plug in an external drive, open Control Panel, and under System and Security select Save backup copies of your files with File History. Select Turn on and let the first backup finish.
In Advanced settings, pick how often File History saves copies; daily is a good fit for most people. Our guide on how to back up a laptop explains the 3-2-1 rule and how the two tools fit together.

A 1 TB portable drive holds File History copies of a typical laptop, with room for older versions.
- This external hard drive features a mirrored logo stripe combined with a striped
- The motherboard adopts JMicron 578 noise-free solution, giving you a quiet working
Check the first backup the next day: confirm File History ran and the folders show as backed up in Windows Backup. A backup you never checked is a guess, not a safety net.
Steps 10 to 12: Update Windows, clean up and move your files in
Now update Windows. Go to Settings > Windows Update and select Check for updates. Install what it offers, restart when asked, and check again until it reports that you are up to date.
Windows Update delivers most drivers, and the maker’s support app or support site covers the rest. Do this before you install your own software, so a bad driver shows up before your files and programs are in place.
Next, clean up the software that came with the laptop. Open Settings > Apps > Installed apps and look through the list. Uninstall trial antivirus tools, games and utilities you will never open, but leave drivers and maker support apps alone.
Then open Settings > Privacy & security > Windows Security and confirm virus and threat protection is on. Set a sign-in PIN in Settings > Accounts > Sign-in options, and turn on Windows Hello face or fingerprint sign-in if your laptop supports it.
Finally, move your files across. If you still have the old laptop, copy your documents, photos and browser bookmarks to the new machine with an external drive or a cloud folder, and check that the files open before you wipe the old one.
Our guide on how to transfer files from your old laptop to a new laptop covers the options. Then file the paperwork: put the receipt photo, serial number, warranty confirmation and return deadline in one folder.
If you want more starting points, the Basics and how it works hub gathers the beginner guides for this site.
Mistakes to avoid
Throwing the box away on day one. Keep the box, the receipt and all the cables until the return window closes. Without them, an exchange takes longer.
Skipping the screen check because the laptop looks fine. Dead pixels and backlight bleed are easy to miss on a bright desktop background. Full-screen white and black images take two minutes and catch both.
Making the recovery drive on a drive that holds files. The tool erases the USB drive before it starts, so copy anything you need off it first, or use a blank one.
Treating a restore point as a backup. A restore point rolls back system files and settings, but it does not save your documents or photos. Set up Windows Backup or File History as well.
Installing everything before updating Windows. Update Windows and drivers first, then install your programs. A driver problem is far easier to trace on a clean machine.
Frequently asked questions
How long does the full 12-step checklist take?
The inspection steps take about half an hour, and the warranty and return-window checks take a few minutes more. The recovery drive and the first backup run in the background, so the hands-on time is under an hour. Spread the rest across the first week.
What should I do if I find a dead pixel on day one?
Take a photo of the screen showing the fault, then contact the seller and ask for an exchange. The return window is the fastest route to a replacement. Do not open the laptop or try to fix the screen yourself, since that can void the warranty.
Do I need a recovery drive if I already have a backup?
Yes, because they do different jobs. A backup saves your files. A recovery drive holds the Windows repair tools and system files you need when the laptop will not start at all. A backup cannot boot a dead laptop, and a recovery drive cannot restore your documents.
Should I register the warranty if the store already has my details?
Yes. The store’s records prove you bought the laptop, but registering on the maker’s support site confirms the warranty start date and ties the serial number to your name. That makes support calls faster and avoids disputes about when cover began.
Can I skip the restore point if Windows Update already ran?
No. A restore point is a snapshot you can roll back to after a bad driver or a failed update. Windows makes some restore points on its own, but a manual point taken when the laptop is healthy gives you a known-good state to return to.
Bottom line: Inspect the laptop, register the warranty, note the return date, then build your safety net with a recovery drive, a restore point and a backup schedule. Do those steps in the first week.
Sources: Microsoft Support, Recovery Drive; Microsoft Support, Back up and restore with Windows Backup; Microsoft Support, System Protection. Photos: Adrian Regeci, Tima Miroshnichenko, Kaboompics, Budget Bizar and Szymon Shields via Pexels. Diagram: ICT Service Center.