
 By
A clean install of Windows 11 wipes the drive and puts a fresh copy of Windows on it, with no old apps, settings or broken files carried over.
In short: Back up everything first, then use Microsoft’s Media Creation Tool on a working PC to make a bootable USB drive of at least 8 GB. Boot the target PC from that USB, choose Custom install, and delete the old partitions on the system drive. After setup, run Windows Update, install drivers from the PC maker’s site, check activation, and restore your files.
Key takeaways
- A clean install erases the drive you install to, so back up first.
- The Media Creation Tool is the only safe source for the installer, and it needs a blank USB drive of 8 GB or more.
- Choose Custom install, not Upgrade, or you will keep the old system instead of replacing it.
- Most PCs activate on their own after a clean install through a digital licence tied to the hardware.
- Drivers and Windows Update come after setup, and the PC maker’s site is the place to get them.
Before you start: back up everything first
A clean install is the most thorough way to reinstall Windows, and the most destructive. When you delete the partitions during setup, every file, app and setting on that drive goes with them, and there is no undo step. There is more on laptop usb not working in a separate guide.
Copy your documents, photos, videos, music and work files to an external drive or a cloud service you trust, and check the folders people forget: Desktop, Documents, Downloads and Pictures. Export browser bookmarks and passwords if they are not already synced. If you back up your laptop on a regular schedule already, run one fresh backup now and open a few files on another device to confirm they are readable.
Also check whether the drive is encrypted. If BitLocker or device encryption is on, you will need the recovery key later, so find it before you wipe anything.
Warning: A clean install deletes every file, app and setting on the drive you install Windows to. Do not start until your backup is complete and a few files open.
The Media Creation Tool builds media for x64 PCs only, so check first that the PC meets the Windows 11 system requirements, including a 64-bit processor, TPM 2.0 and Secure Boot.

A clean install erases the drive, so your files need a home outside the PC first.
- Slim durable design to help take your important files with you
- Back up smarter with included device management software[2] with defense against
What you need
You need a working Windows PC to build the USB drive, and it can be a different PC from the one you are fixing. You also need an internet connection and a blank USB flash drive of at least 8 GB, because the tool downloads several gigabytes of Windows. Everything on that USB drive will be erased, so move anything on it somewhere safe first.
Keep the PC plugged in, because a laptop that dies halfway through leaves the drive half-written. The other half of this decision is checking for physical connection faults.
| Item | Detail |
|---|---|
| Difficulty | Moderate, mostly waiting |
| Time | About 1 to 2 hours |
| Tools | Working Windows PC, blank USB drive of at least 8 GB, power adapter |
| Risk | High without a backup, low with one |
If this is the only PC you have, build the USB drive while Windows still works, or borrow a PC. The tool runs on Windows 10 or Windows 11, and you need administrator rights on that PC.
How to make the Windows 11 installation USB
The Media Creation Tool is a small free download from Microsoft that builds the bootable USB drive for you. Get it only from Microsoft’s own Download Windows 11 page, under Create Windows 11 Installation Media. Any other download site is a risk you do not need to take.
- On the working PC, open the Download Windows 11 page and click Download Now under Create Windows 11 Installation Media.
- Run MediaCreationTool.exe as an administrator, then select Accept.
- Select Create installation media for another PC, then select Next.
- Pick the language, edition and architecture, or leave Use the recommended options for this PC checked.
- Select USB flash drive and pick the right drive. Remove other USB drives first so you cannot pick the wrong one.
- Wait while the tool downloads Windows 11 and writes it to the USB drive, then select Finish.
Check the drive first: it should show files such as setup.exe in File Explorer. If the tool reports an error, try a different port or drive.

Microsoft needs at least 8 GB, and a 32 GB drive leaves spare room for a recovery drive later.
- The durable, light-weight design of the Turbo Attaché 3 USB 3.0 Flash Drive is the
- Perfect for transferring large files such as movies, videos, photos, music & documents
How to clean install Windows 11 from the USB
Plug the USB drive into the PC you want to wipe, then restart it. If the PC does not start from the USB drive on its own, open the boot menu or change the boot order in the BIOS or UEFI settings. The key is usually F2, F12, Delete or Esc, pressed right after you turn the PC on.
- On the Install Windows page, select your language, time and keyboard settings, then select Next.
- Select Install Windows and wait for setup to load.
- When asked for a product key, enter it if you have one. If the PC came with Windows 11, select I do not have a product key. Windows will usually activate on its own later.
- Choose the edition that matches your licence, then accept the license terms.
- Select Custom: Install Windows only (advanced). Do not select Upgrade, because that keeps the old system.
- On the drive list, delete each partition on the system drive until it shows as one block of unallocated space. Leave other physical drives alone.
- Select the unallocated space and select Next. Windows will copy files and restart several times. Do not turn the PC off.
- When setup reaches the first-run screens, pick your region and keyboard, connect to Wi-Fi, and sign in with a Microsoft account. Windows 11 Home needs both at this step.

Warning: Step 6 deletes the partitions on the system drive. Every file on that drive is gone once you confirm the delete. Check the drive size and label twice first, and never delete partitions on a second drive by mistake.
If the PC boots back to the Install Windows page after the install finishes, the boot order is still pointing at the USB drive. Remove the drive and restart. The other half of this decision is upgrade laptop with an ssd.
Clean install vs Reset: which one fits your problem
A clean install and a Reset both give you a fresh copy of Windows, but they are not the same job. A Reset runs from inside Windows and needs no USB drive, while a clean install boots from outside media and replaces everything on the drive. Microsoft’s Recovery options in Windows page lists the gentler options first: try them before you wipe the drive.
| Method | What it keeps | Use it when |
|---|---|---|
| Fix problems using Windows Update | Files, apps and settings | Windows starts but is unstable |
| Reset this PC, keep my files | Personal files only | Problems remain after a repair |
| Reset this PC, remove everything | Nothing | You want a fresh start without making a USB drive |
| Clean install from USB | Nothing on the drive you install to | Windows will not start, Reset fails, or you suspect malware |
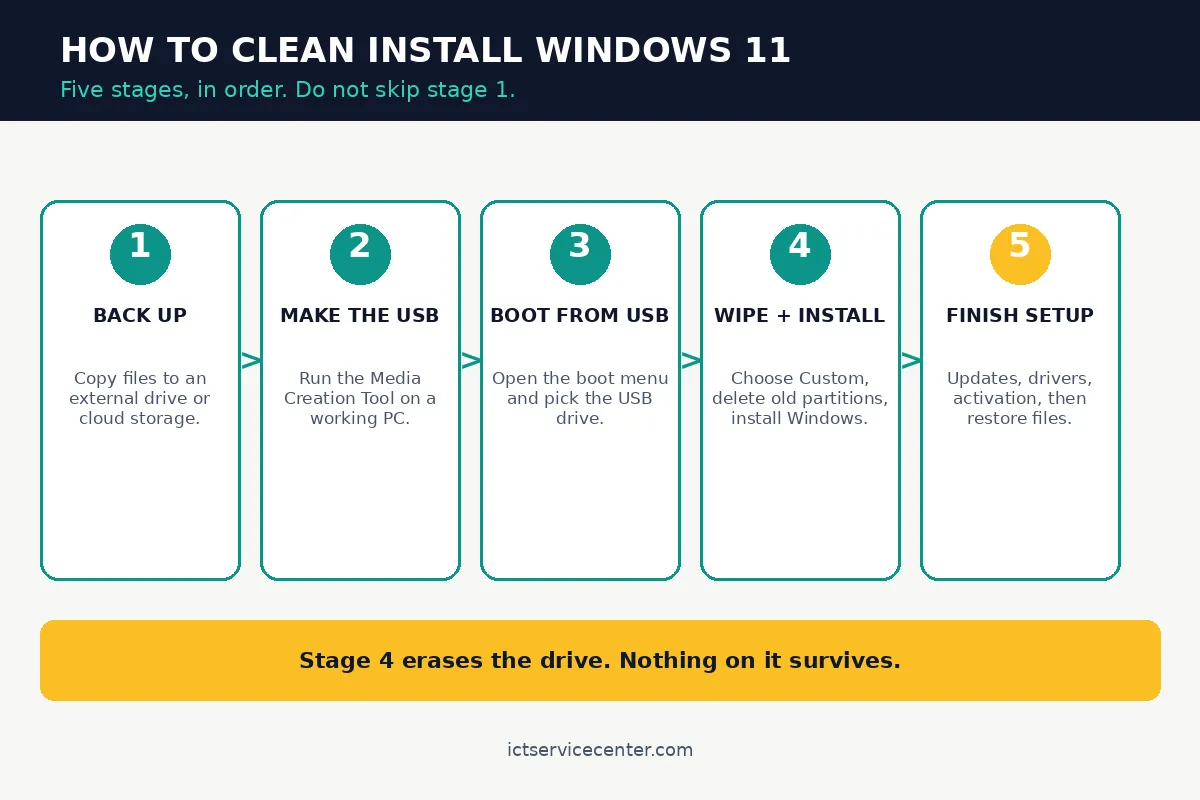
A clean install is the right call when Windows will not start at all, when Reset fails or loops, when you suspect malware, or when you are setting up a used or newly built PC with a blank drive.
It is also the right call when you want to wipe a laptop before selling it. A Reset is the better choice when Windows still starts.
For a way back after a bad update, our guide shows how to create a Windows 11 recovery drive while the PC still works.
After the install: drivers, updates and activation
Once you reach the desktop, the job is only half done. The fresh system needs updates and drivers before it is ready for daily use.
Start with Windows Update. Go to Settings > Windows Update and select Check for updates, then install everything it offers and restart when asked. Run it again after the restart.
Next, visit the PC maker’s support site and install the drivers for your exact model, starting with the chipset, graphics, network and audio drivers. If you reinstall Windows 11 after an SSD upgrade, get the storage and chipset drivers from the maker first.
Check activation at Settings > System > Activation. Most PCs that shipped with Windows 11, or that already ran an activated copy, will show as activated once they connect to the internet, because the digital licence is tied to the hardware. If not, and you signed in with the Microsoft account that holds the licence, use the troubleshooter on that page. If you bought a retail key, enter it there.
Now reinstall your apps from their official sources and restore your files. Check that the files open before you delete the backup copy, and turn on Windows Backup at Settings > Accounts > Windows Backup so your settings have a safety net next time.
If this is a new machine, our guide to set up a new laptop covers the first-hour checks. If you plan to transfer files from an old laptop to a new one, the backup drive you made at the start does that job too.
Test it and when to get help instead
How to tell the clean install worked
Restart the PC and confirm it boots to the desktop without the USB drive plugged in. Check Wi-Fi with a browser page and sound with a short video, and open Settings > System > Display to confirm the screen runs at its native resolution. Open Device Manager with Win + X and look for yellow warning icons, which point to a missing driver.
When to get help instead
Stop and take the PC to a repair shop if the drive does not show up in the BIOS or in the setup drive list, if setup fails on the same step after two tries with a fresh USB drive, or if the PC shuts off or restarts on its own during the install.
Those signs point to failing hardware, and no reinstall will fix that. The same goes for a PC with a swollen battery or a smell of burning: unplug it and get help.
If the PC belongs to a school or workplace, check with the IT department first.
Mistakes to avoid
Starting without a backup. The delete step cannot be undone. Copy the files first, open a few of them on another device, and only then boot from the USB drive.
Picking Upgrade instead of Custom. Upgrade keeps the old system and the problems that came with it. A clean install needs Custom, plus the partition deletes that follow it.
Deleting the wrong drive. If the PC has two drives, the setup list shows both. Match the drive by size and label, and delete partitions only on the system drive.
Forgetting the BitLocker recovery key. An encrypted drive can lock you out of recovery tools after the install. Save the key before you wipe anything.
Skipping drivers and updates after setup. A fresh desktop with missing network or graphics drivers looks broken when it is only unfinished. Run Windows Update and install the maker’s drivers before you call the job done.
Frequently asked questions
Does a clean install of Windows 11 delete everything?
Yes. A clean install deletes every file, app and setting on the drive you install Windows to, including the old copy of Windows. Other physical drives are left alone, but anything on the system drive is gone, so back up first.
Do I need a product key for a clean install of Windows 11?
Usually not. Most PCs that shipped with Windows 11, or that already ran an activated copy, carry a digital licence tied to the hardware. At the product key screen, select I do not have a product key and Windows will normally activate on its own.
Can I clean install Windows 11 without a USB drive?
Not with this method, because the installer has to boot from outside the system it is replacing. You can use a blank DVD instead if the PC has a burner, or use Reset this PC when Windows still starts. Use the USB method when Windows will not start or Reset keeps failing.
Do I need a Microsoft account to clean install Windows 11?
Windows 11 Home asks for an internet connection and a Microsoft account during setup, with no supported way around that screen. Windows 11 Pro lets you choose a local account instead. Signing in with a Microsoft account also helps activation and Windows Backup.
Bottom line: Back up first, build the USB drive with Microsoft’s Media Creation Tool, boot from it, choose Custom install, and delete the old partitions. Then run Windows Update, install the maker’s drivers, check activation, and restore your files. If Windows still starts, try Reset first. For more repair guides, browse the Repair and Upgrades guides.
Sources: Microsoft Download Windows 11, Microsoft Support Recovery options in Windows. Photos: Isabella Mendes, Anete Lusina, Kaboompics, Andrey Matveev, Sai M via Pexels.