
 By
You hold a new monitor but your PC only has one port, or you just need a second screen for a bigger workspace. This page shows you exactly which cable to use and how to get your desktop on the new screen in under five minutes.
In short: To connect a monitor, match your PC’s video output to the monitor’s input using the right cable. Plug it in, power on both devices, and set your PC to extend or duplicate the display. Most setups are plug-and-play once the physical connection and display mode are correct.
Quick picks
Our shortlist for this job · tap one to see today's price
Supports high refresh rates and large data bandwidth for smooth, clear external displays.
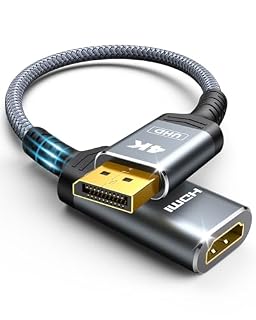
Lets you bridge a DisplayPort PC output to an HDMI monitor for reliable video.
What You Need to Connect Your Monitor
Before touching your computer, gather the necessary tools to make the process smooth. You do not need a soldering iron or advanced technical knowledge, but you do need to have the right physical components at hand. This prevents the common frustration of realizing you are missing an adapter halfway through the setup. Loaders in this spot often ask about first time pc setup as well.
- The right cable or adapter: This is the most critical piece. Identify the video output on your PC and the input on your monitor. If they match, buy a direct cable. If they do not, you need a specific adapter.
- External power for the monitor: Most monitors need a separate power plug. While some modern laptops can power smaller monitors via USB-C, check the monitor’s power requirements first.
- Driver updates (optional but recommended): Ensure your graphics drivers are up to date. This helps the operating system detect the new screen immediately and supports high resolutions.
Safety first: Turn off both your PC and the monitor before plugging in cables. This prevents static electricity from damaging your ports and helps your system recognize the new monitor instantly.
A high-bandwidth HDMI cable prevents signal drops if you are using a modern PC for gaming or 4K display.
- Top Technology--8K@60HZ: This 8K Ultra-High Speed 2.1 HDMI Cable uses the most
- Upgrade Revolution: Highwings Ultra High Speed HDMI Cable 2.1 8K supports 48Gbps
If you have not bought the screen yet, start with our picks for the best monitor for laptop, chosen for one-cable laptop desks.
Match Your Ports Before You Buy
Looking at the back of your hardware is the detective work that saves you from buying the wrong gear. The ports you see on your computer dictate everything else. If you buy a cable that does not physically fit, you are stuck. Spend two minutes identifying what you have.
Check the PC’s video output first. For desktops, look at the side of the graphics card (GPU). If you have a dedicated graphics card, ignore the vertical ports on the motherboard; they use weaker integrated graphics. The horizontal ports on the GPU provide the performance you need. For laptops, the ports are on the sides.
Compare it to the monitor’s input. Most modern monitors feature HDMI and DisplayPort inputs. If your PC has USB-C, check the monitor’s manual to see if it supports USB-C video via DisplayPort Alt Mode. Many budget monitors do not.
Select the correct connection type. Use this guide to choose your cable:
- HDMI to HDMI: Buy a standard HDMI cable. This is the most common setup for desktops and laptops.
- DisplayPort to DisplayPort: Buy a DP cable. This is the best choice for high-refresh-rate gaming monitors (144Hz or higher).
- USB-C to HDMI: Buy an active adapter. This is ideal for modern slim laptops that lack HDMI ports.
- VGA: If you see the blue port, you are using legacy hardware. You need a VGA cable, which does not carry audio.
Physically Connect the Monitor
Once you have the right cable or adapter, the physical connection is the easiest part. However, small mistakes here can cause the “No Signal” error later. Follow these steps to ensure a secure and stable fit. The other half of this decision is why an desktop owning is a nightmare.
- Power off both devices. While modern systems handle hot-plugging, turning them off prevents potential power surges and ensures a clean handshake when they restart.
- Connect one end to the PC. Insert the cable into the video output port. Ensure it clicks or locks into place. If using an adapter, make sure it is firmly seated on both ends.
- Connect the other end to the monitor. Plug into the matching input port on the back of the screen. Some DisplayPort cables have small thumbscrews; tighten them gently to secure the connection.
- Connect power and turn on. Plug the monitor’s power cable into the wall outlet and switch on the monitor. Then, boot up your PC.
If your PC has DisplayPort but your monitor only has HDMI, this adapter bridges the two so the screen will light up.
- 4K UHD and AUDIO SYNC: Supports up to 4K@30Hz resolution with backward compatibility
- DIRECTIONAL DISPLAYPORT to HDMI ADAPTER: is designed for one-way conversion from
Fix the "No Signal" or "No Input" Error
If the screen stays black or displays No Signal, do not panic. This is the most common hurdle in monitor setup. It usually means the monitor is on, but it is not looking at the correct port, or the PC has not detected the new device.
Step 1: Check the Input Source manually. Use the physical buttons on the monitor (usually under the screen or on the back) to find the Input or Source menu. Many monitors are set to a default port (like DisplayPort 1) by factory settings.
If you plugged into HDMI, you must manually switch the monitor to HDMI. This is the #1 cause of black screens.
Step 2: Force the GPU to wake up. Sometimes the graphics card stays in a sleep state even when plugged in. On your keyboard, press Windows + P. This opens the projection menu and forces Windows to re-evaluate your display configuration. See if the monitor appears.
Step 3: Reseat the cable. If it still fails, unplug the cable from both the PC and the monitor, then plug it back in firmly. Poor physical contact is a frequent culprit. Try a different port on your graphics card if available.
Step 4: Update your drivers. If the monitor is not detected in Windows settings, go to your graphics manufacturer’s website (NVIDIA, AMD, or Intel) and download the latest driver. Corrupted or outdated drivers often fail to recognize new external displays. If that sounds like your bench, read up on desktop start-up steps next.
Pro tip: If you are using a laptop, make sure your sleep settings aren't putting the external display to sleep. You can often wake it by unplugging and re-plugging the cable.
Configure and Align Your Screens
You now have video, but the screens might be arranged incorrectly. For example, you might be moving your mouse to the right to get to the monitor, but the monitor is physically on the left. You need to tell your operating system how they fit on your desk.
Open Display Settings. On Windows 10 or 11, right-click anywhere on your desktop and select Display settings. You will see numbered rectangles representing your screens.
Set the arrangement. Drag these boxes to match your physical setup. If your monitor is to the right of your laptop, drag box 2 to the right of box 1. If it is on the left, drag it there. This ensures your mouse travels in the correct direction.
Choose your display mode. Press Windows + P to quickly switch between modes, or use the dropdown in Display Settings:
- Duplicate: Both screens show the same thing. Best for presentations or showing someone your screen.
- Extend: Each screen has its own desktop area. This is the “holy grail” for productivity, allowing you to drag windows across screens.
- Second Screen Only: Turns off your laptop screen. Ideal for using a laptop like a desktop computer.
Finally, check the Resolution setting in the Display menu. If the image looks blurry or stretched, select the resolution marked as Recommended for that specific monitor. This ensures you get the crispest possible image.
Common Mistakes and How to Fix Them
Even with the right cable, setup issues arise from simple oversights. Knowing these common pitfalls will save you time.
- Plugging into the motherboard: Instead of using the weak integrated graphics port, use the horizontal ports on your dedicated graphics card for better performance and high refresh rates.
- Confusing adapters: Instead of using a passive cable that might not carry audio or support high resolutions, verify your converter is active and supports the exact digital signal your monitor requires.
- Using a cable that is too short: Instead of buying a cable that strains the connection or a long one that sags dangerously, measure the distance between your PC and monitor before purchasing. A short cable causes physical stress on the ports.
- Ignoring scaling: A 4K monitor on a laptop can make text unreadably small. If your text looks tiny, go to Display Settings and adjust the Scale and Layout to 150% or 200%.
The bottom line
To connect your monitor, start by identifying the matching video ports on your PC and monitor, then use the correct cable or adapter to bridge them. Power off both devices for the physical connection, then use the display settings to arrange your screens for maximum efficiency.
- Top Technology--8K@60HZ: This 8K Ultra-High Speed 2.1 HDMI Cable uses the most
- Upgrade Revolution: Highwings Ultra High Speed HDMI Cable 2.1 8K supports 48Gbps
Frequently asked questions
Can I connect a monitor without a cable?
No, a physical connection is required for video data unless your PC and monitor support a proprietary wireless video technology like Intel Wi-Fi Display (WiDi). For most users, you must use a cable or an active adapter to transmit the image reliably.
Which port is better: HDMI or DisplayPort?
DisplayPort is generally better for gaming and high-resolution work because it supports higher refresh rates (like 144Hz or 240Hz) and greater bandwidth. However, HDMI is more common and sufficient for standard 1080p or 4K work and media consumption.
Why is my monitor blurry after connecting?
A blurry display usually means the resolution is not set to the monitor’s native size. Open your display settings, find the ‘Display Resolution’ dropdown, and select the option marked as ‘Recommended’ to ensure a crisp, sharp image. You may also need to adjust scaling.
Can I connect a monitor with USB-C only?
Yes, but only if your monitor has a USB-C input that supports ‘DisplayPort Alt Mode.’ Not all USB-C ports can carry video, so you must check the monitor’s manual to ensure it is compatible with your laptop’s video output capabilities.
You can also use a laptop as a second monitor if you have a spare machine on your desk.