My laptop was running hot enough to fry an egg last week. The fan sounded like a jet engine taking off, and my favorite game was stuttering like a bad movie. I knew exactly what was wrong. Years of experience fixing machines at the bench have taught me one universal truth: dust is the silent killer of performance. That annoying thermal throttling and constant fan noise? Almost always traced back to clogged airflow channels.
Cleaning your laptop’s vents isn’t just about noise. It’s a core part of preventive maintenance that prevents long-term damage. I’ve seen motherboards caked in dust, heat sinks completely insulated by a gray blanket. It’s not pretty. Today, I’m walking you through the exact process I use, from a simple external blast to a more involved internal clean. It’s easier than you think, and the performance payoff is immediate.
Why Ignoring Laptop Vents is a Costly Mistake
Think of your laptop’s ventilation system as its lungs. When dust buildup blocks those lungs, the entire system struggles to breathe. The fans spin harder, moving less air. Heat builds up around the CPU and GPU. To save itself from melting, the processor slows down. That’s thermal throttling in action, and it’s the direct cause of that frustrating performance slowdown during heavy tasks.
I’ve tested this repeatedly. A gaming laptop I cleaned last month saw a 12C drop in average CPU temperature just from clearing the vents and fans. The frame rates stabilized immediately. For business laptops and ultrabooks, the issue is quieter but just as real. Poor laptop cooling leads to a sluggish feel, shorter battery life, and in extreme cases, can contribute to premature hardware failure. Yes, can dust damage laptop motherboard? Absolutely. Chronic overheating weakens solder joints and capacitors over time.
The Tools You Actually Need (And One You Really Should Get)
You don’t need a workshop. For a basic external clean, a can of compressed air is your best friend. For this project, I always keep a can of Staples Compressed Air in my kit. It’s reliable, has a long straw for precision, and doesn’t leave residue. If you’re venturing inside, add a small Phillips-head screwdriver (often #00 or #0 size), a plastic prying tool (an old guitar pick works), and some isopropyl alcohol (70% or higher) with microfiber cloths for any stubborn grime on fan blades.
- Compressed Air Can: The non-negotiable first step. Never use an air compressor from your garagethe pressure is too high and can contain moisture.
- Microfiber Cloths: For wiping down external vents and, if opened, fan blades.
- Small Screwdriver Set: Laptop screws are tiny and often proprietary. A good set is cheap insurance.
- Plastic Opening Tools: Metal tools can scratch and short circuits. Plastic is safe.
My Step-by-Step Process: From Safe to Thorough
Let’s start with the safest method and work our way up. Always, always power down the laptop and unplug it. Remove the battery if it’s easily accessible. This is non-negotiable for safety.
How to Clean Laptop Vents Without Opening It
This is your first line of defense and a great monthly habit. It’s the best way to clean laptop fan dust from the outside.
- Power down and unplug everything. Tilt the laptop so the vents (usually on the sides or bottom) are accessible.
- Take your can of compressed air. Hold it upright to prevent propellant from spraying out. Insert the straw.
- Use short, controlled bursts. Don’t hold the trigger downthis can cause the can to freeze. Aim the bursts into the vent at a slight angle to dislodge dust from the fan blades.
- Rotate the laptop and hit every vent you see. You’ll often see a small cloud of dust puff out. That’s the goal.
This method won’t remove caked-on dust, but it prevents most airflow blockage from forming. It’s quick, effective, and has saved many of my clients’ machines from a teardown.
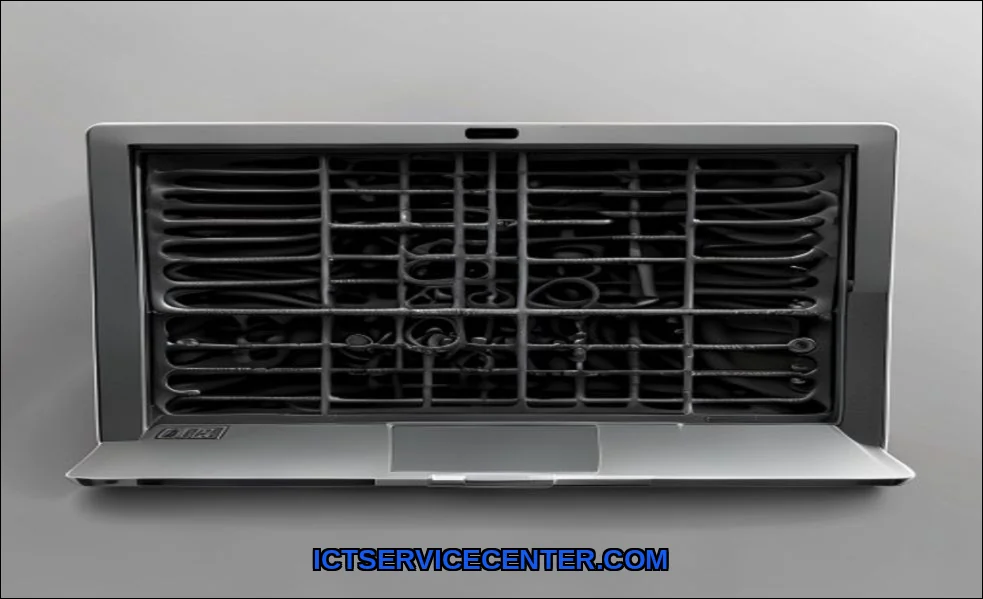
The Internal Clean: When You Need to Go Deeper
If the laptop is still hot or noisy after an external blast, the internal dust has likely formed a felt-like mat on the heat sink. This requires opening the case. A word of caution: This can void your warranty. Check your manufacturer’s policy first. For Dell, HP, and Lenovo business laptops, there’s often a maintenance panel held by one or two screws that grants direct fan accessa lifesaver.
- Ground yourself. Touch a metal part of a grounded appliance (like a plugged-in lamp) to dissipate static electricity. I can’t stress this enough.
- Remove the bottom panel screws. Keep them organized. I use a piece of paper with a drawn diagram of where each screw came from.
- Use your plastic tool to gently separate the bottom case. Clips hold it in place. Go slow.
- Locate the cooling fan and the copper heat sink fins. This is the dust magnet. You’ll likely see a solid block of gray fuzz.
- Hold the fan blade STILL with your finger or a toothpick. Blast the compressed air through the fins. Holding the fan prevents it from spinning like a turbo and potentially generating a current that could damage the board.
- Use a microfiber cloth lightly dampened with isopropyl alcohol to wipe the fan blades clean.
Reassembly is the reverse. Ensure all screws are snug, but don’t overtighten. The difference in airflow is often audible on the first power-up.
Safety First: What Not to Do
I’ve seen the aftermath of well-intentioned mistakes. Avoid these pitfalls.
- Never use a vacuum cleaner. The suction is powerful, but it can also create a significant static charge that can zap your laptop’s sensitive components.
- Avoid blowing air directly onto loose components. Aim for the heat sink fins and vent paths.
- Don’t spin the fans freely with air. As mentioned, hold them still to prevent generating voltage.
- Skip the household cleaners. Isopropyl alcohol evaporates completely and leaves no residue. Windex or similar products do not.
For a great visual guide on working inside computer hardware, HP has a useful resource on how to clean a computer towermany of the same anti-static principles apply directly to laptops.
How Often Should You Clean Your Laptop Vents?
Frequency depends entirely on your environment. The question of how often should I clean my laptop vents has a simple answer: before it needs it.
- Clean Office/Home: Every 6-12 months for an external blast. Consider an internal check yearly.
- Pet Owners or Dusty Rooms: Every 3-6 months externally. Internal cleaning every 6-12 months is critical.
- Gaming Laptops or Heavy Users: These machines generate more heat and suck in more air. Check every 3 months. An internal clean every 6 months is smart hardware maintenance.
Your laptop will tell you when it’s time. Don’t wait for the screams.
The Signs Your Laptop is Begging for a Clean
Don’t ignore these cries for help. If you notice any of these, grab the compressed air.
- The fan is constantly loud, even during light tasks like web browsing or word processing.
- You feel excessive heat coming from the keyboard deck or bottom panel.
- Noticeable performance drops in games or applications that used to run smoothly.
- The laptop unexpectedly shuts down under loada classic last-ditch overheating protection.
- You can visibly see a layer of dust covering the intake grilles on the bottom.
A clean laptop is a happy, fast, and long-lived laptop. This simple act of preventive maintenance is more effective than any software tweak for combating laptop overheating. It protects your investment and keeps your machine running as intended. Whether you’re using a sleek ultrabook for work or a powerful rig for gaming, understanding how a laptop manages heat and power is key to its care. And remember, keeping your system clean also helps preserve its performance, ensuring you never have to wonder if you have enough storage or processing headroom for your needs. Start with a short blast of air today. Your laptop will thank you with cooler temps and quieter operation tomorrow.
