
You are staring at a cramped, cluttered desk that makes your neck hurt and your attention scatter during work calls. This guide gives you the exact seven items and arrangement steps to fix that immediately.
In short: Start with a stable desk surface and an adjustable monitor arm to align your sightline. Add a full-size keyboard with a proper wrist rest and a quality chair that supports your lumbar curve. Manage cables under the desk to clear the workspace and reduce visual noise.
Quick picks
Our shortlist for this job · tap one to see today's price
Lets you run two 4K screens and charge your PC from a single cable connection.

Elevates your laptop to eye level so you can stop hunching over a low desk.
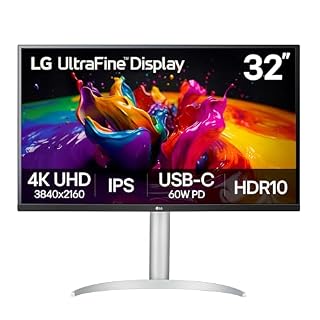
Offers a large 4K canvas that reduces text squinting and screen fatigue during long sessions.
What you need before you start
Your workspace setup fails when tools are too close or out of reach. Gather these items before rearranging your desk. Having them ready makes the alignment steps quick and accurate. Skipping these prep steps often leads to awkward compromises in posture later in the day. It helps to understand to connect keyboard mouse to computer before going further.
- Measuring tape for desk depth and monitor distance
- Velcro straps for cable bundling
- Surge-protected power strip with enough outlets
- Desk mat for keyboard and mouse comfort
Check that your power strip has sufficient length to reach the wall outlet without crossing the leg space. A short cord forces the strip to sit under the desk where it traps heat. Ensure the desk mat is large enough to accommodate both the keyboard and mouse without them sliding off the edge.
Pro tip: Label all cable ends with masking tape before you start moving equipment to avoid confusion.
Connects your PC to two screens and peripherals with one USB-C cable.
- The Anker Advantage: Join the 50 million+ powered by our leading technology.
- Massive Expansion: Equipped with a USB C PD-IN charging port, 2 USB-A data ports, 2
Step 1: Set the desk height and depth
Place your desk at a height where your elbows stay level when typing. The surface should be deep enough for a proper monitor distance. This prevents you from leaning forward to read the screen. If your desk is not height-adjustable, adjust your chair instead to reach the correct typing position.
- Set the desk height so your forearms are parallel to the floor.
- Measure 30 inches of depth from the front edge to the monitor.
- Check that your knees have clear space beneath the desk surface.
- Ensure your feet are flat on the floor or on a footrest.
A standard desk height is often 28 to 30 inches, but individual proportions vary. If your elbows drop when the desk is too high, your shoulders will shrug over time. If the desk is too low, your back will curve forward. A standing desk converter helps here by allowing quick height changes throughout the day.
Safety first: Do not stack books under the desk to raise it; use a proper footrest if your feet do not reach the floor.
Step 2: Align the monitor at eye level
Position the top of your monitor at or slightly below eye level. Center the screen directly in front of your midline. This keeps your neck in a neutral position during long tasks. Using a monitor arm allows you to rotate and tilt the screen for optimal viewing angles without straining your neck. Before you buy anything, it is worth looking at core items for desktop setup.
- Attach the monitor to an arm or riser stand.
- Adjust the height until the top bezel aligns with your eyes.
- Set the screen distance to about an arm’s length away.
- Angled the screen slightly toward you, about 10 to 20 degrees.
If you use a dual monitor setup, place the primary screen in the center. Angle the secondary screen inward toward the primary. This reduces the amount of head rotation required to switch between windows. A 4K monitor provides sharp text that remains readable even at longer distances.
Provides the large 4K screen that makes text crisp at this viewing distance.
- Details Mastered - Experience the brilliance of Ultra HD with 4K UHD resolution
- Enjoy the Latest HDR Videos and Games - HDR10 elevates picture quality for a more
Step 3: Position the keyboard and mouse correctly
Place the keyboard directly in front of you with elbows at a 90-degree bend. The mouse should sit at the same height and within easy reach. This prevents wrist extension and shoulder strain. A vertical mouse can help reduce grip pressure if you experience hand fatigue or tingling in the fingers during long sessions.
- Center the keyboard on the desk mat in front of your body.
- Place the mouse adjacent to the keyboard, not under the desk.
- Use a wrist rest if you type for extended periods without breaks.
- Keep the keyboard and mouse surfaces clean and dry to prevent skin irritation.
Avoid using the mouse pad directly on the desk surface if it causes friction. A dedicated mouse pad provides a smoother glide. Ensure the keyboard is not tilted too steeply, as this forces your wrists into extension. A flat or negative tilt is safer for long typing sessions.
Step 4: Tuck away cables and power supplies
Bundle all loose wires under the desk to clear the surface. Use a cable tray or adhesive clips to keep lines off the floor. This reduces visual clutter and prevents accidental unplugging. A neat cable setup also makes it easier to see what needs cleaning or replacing when equipment changes.
- Group monitor, PC, and peripheral cables together with Velcro straps.
- Mount a cable tray under the desk to hold the power strip.
- Label cable ends to identify connections quickly during swaps.
- Route cables away from the leg space to avoid tripping hazards.
Do not use twist ties or zip ties that are too tight, as this can damage the cable insulation over time. Velcro ties are reusable and adjustable. Keep the power strip on a shelf or high up on the wall if possible, so it is not in the way of your legs or feet.
Step 5: Manage lighting to reduce eye strain
Position task lighting to the side of the monitor, not above or behind. This avoids glare on the screen and reduces the contrast between the bright screen and the dark room. Use a lamp with adjustable color temperature to match the time of day.
Warmer light in the evening helps you relax, while cooler light supports focus during the day. We go through choose the optimal desktop configuration for a home office step by step in its own article.
- Place a desk lamp on the side of the monitor that does not reflect on the screen.
- Adjust the brightness to match the ambient light in the room.
- Use dimmable bulbs if available to fine-tune the lighting.
- Close blinds or curtains to control sunlight glare on the monitor.
Fluorescent lights often cause flicker and eye fatigue. If your office uses these, consider a desk lamp with LED lighting to create a balanced light source. Ensure the light does not shine directly into your eyes, as this causes squinting and headaches over time.
Pro tip: Set your monitor brightness to match the brightness of the paper or documents next to it.
Common mistakes that ruin a productive setup
Even with the right equipment, incorrect placement negates the benefits. Watch for these frequent errors that lead to discomfort and lower focus. Fixing these takes only a few minutes but makes a huge difference in long-term comfort and productivity levels.
- Mistake: Placing the mouse too far from the keyboard. Fix: Keep it adjacent to the right side of the keyboard.
- Mistake: Staring at a screen that is too low. Fix: Elevate the monitor so the top edge meets your eye line.
- Mistake: Letting cables dangle over the desk edge. Fix: Run all wires along the back or under-desk tray.
- Mistake: Sitting back in the chair with no lumbar support. Fix: Adjust the chair to support the natural curve of your lower back.
The bottom line
Start by elevating your monitor and decluttering your desk surface with cable management. This gives you the physical stability to work for hours without fatigue. If you use a laptop, the stand is the single best upgrade for posture and ergonomics.
- Ergonomic Posture Correction: Designed to elevate your laptop to the perfect eye level
- Unshakable Dual-Rod Stability: Unlike single-hinge models, our stand features a highly
Frequently asked questions
How far should my monitor be from my eyes?
Keep the screen about an arm’s length away, or roughly 20 to 28 inches. The top of the display should sit at or slightly below your eye level to keep your neck straight and reduce strain.
Do I need a standing desk for a productive setup?
No, a standard desk works if it is at the correct height. A standing converter is optional but helpful if you experience lower back stiffness after long sitting sessions. Focus on the chair and monitor alignment first.
What is the best cable management solution for a small desk?
Use adhesive cable clips along the back edge of the desk. Add a small under-desk tray for the power strip to keep the surface completely clear and organized.
Where should I place a webcam for video calls?
Mount the webcam at eye level, usually on top of the monitor. This creates a natural eye contact feel during virtual meetings instead of looking up at a low angle. Check for glare before recording.